甲骨文几天前在选配实列中提供了一个新的选项 VM.Standard.A1.Flex。根据用户协议,可以自由分配 4个OCPU,24 GB 内存,最大200GB空间容量和4GB的带宽。新开出的免费机型配置不可思议地高,令人难以置信。
据了解,该机型仅部分区域可开通。它不占用此前开出的2台免费服务器的配额。但是,因为抢购火爆,所以一机难求。如果你不用个脚本跑一跑估计 很难抢到vps。这篇就用宝塔面板来部署这个玩意,脚本代码大鸟博客。
如果你还没有甲骨文,可以看之前的申请教程:甲骨文申请
如果觉得这个麻烦,可以看之前的js脚本:Oraclecloud甲骨文 – 免费VPS获取自动脚本代码
1、安装Terraform
1)Terraform官网:https://www.terraform.io/downloads.html
2)宝塔面板安装Terraform,先下载!
wget https://releases.hashicorp.com/terraform/0.15.4/terraform_0.15.4_linux_amd64.zip
解压,并移动文件terraform到/usr/bin目录
unzip terraform_0.15.4_linux_amd64.zip
mv terraform /usr/bin
查看版本,可以用如下命令
terraform version
如下显示,表示安装成功。
[root@host63c0dcac37 ~]# terraform version
Terraform v0.15.4
on linux_amd64
[root@host63c0dcac37 ~]#
2、安装oci-cli工具
1)安装,一路回车即可,默认安装在/root/bin目录
bash -c "$(curl –L https://raw.githubusercontent.com/oracle/oci-cli/master/scripts/install/install.sh)"
2)当出现“===> Modify profile to update your $PATH and enable shell/tab completion now? (Y/n):”这个时候,是在提示你输入y回车,会自动帮你添加环境变量。之后又是一路回车。出现如下提示表示安装成功。可以用:oci -v 来查询版本!!
===> Modify profile to update your $PATH and enable shell/tab completion now? (Y/n): y

===> Enter a path to an rc file to update (file will be created if it does not exist) (leave blank to use '/root/.bashrc'):
-- Backed up '/root/.bashrc' to '/root/.bashrc.backup'
-- Tab completion set up complete.
-- If tab completion is not activated, verify that '/root/.bashrc' is sourced by your shell.
--
-- ** Run `exec -l $SHELL` to restart your shell. **
--
-- Installation successful.
-- Run the CLI with /root/bin/oci --help
[root@hostf68b156fb8 ~]# oci -v
2.25.0
[root@hostf68b156fb8 ~]#
3、复制租户和用户的ocid
1)甲骨文后台右上角>>用户设置>>分别点击用户和租户,在信息栏中有我们需要的ID,分别点击复制,可以保存在记事本备份好。具体看图: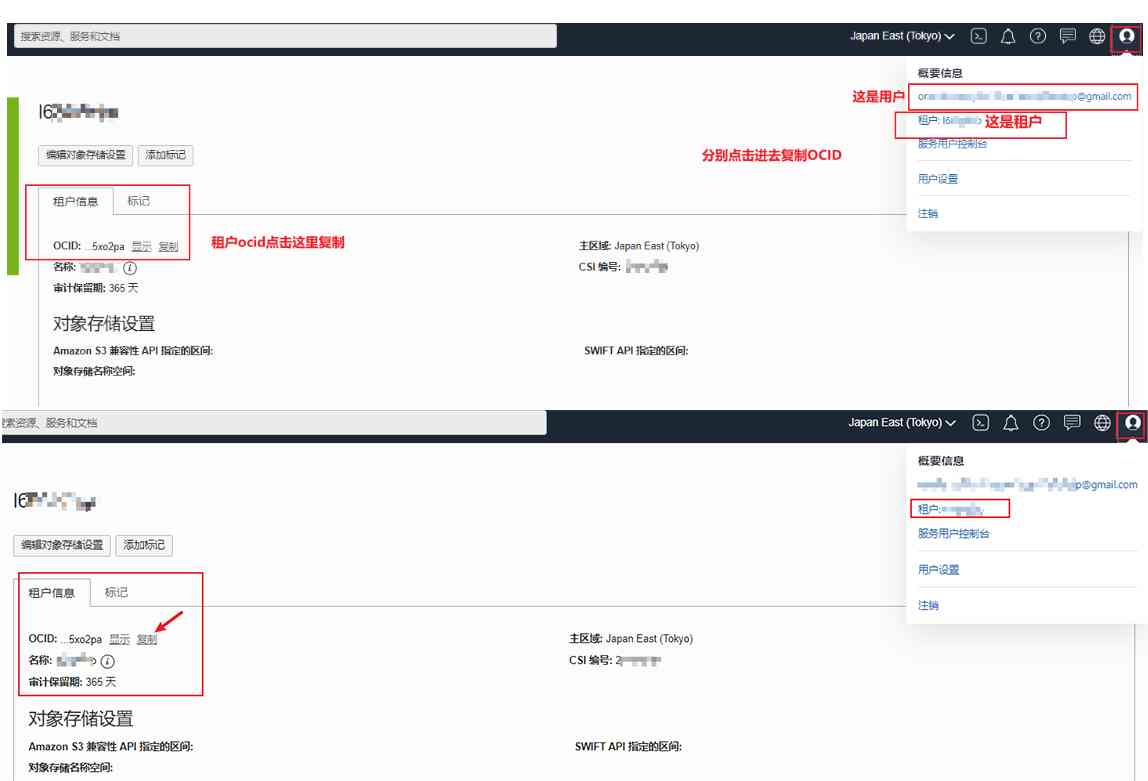
4、配置cli
2)输入如下代码开始配置,配置的路径默认在root目录。
oci setup config
2)具体配置看下面
Enter a location for your config [/root/.oci/config]:
Enter a user OCID: #输入你的用户ocid
Enter a tenancy OCID: #输入你租户的用户id
Enter a region by index or name(e.g.
1: ap-chiyoda-1, 2: ap-chuncheon-1, 3: ap-hyderabad-1, 4: ap-melbourne-1, 5: ap-mumbai-1,
6: ap-osaka-1, 7: ap-seoul-1, 8: ap-sydney-1, 9: ap-tokyo-1, 10: ca-montreal-1,
11: ca-toronto-1, 12: eu-amsterdam-1, 13: eu-frankfurt-1, 14: eu-zurich-1, 15: me-dubai-1,
16: me-jeddah-1, 17: sa-santiago-1, 18: sa-saopaulo-1, 19: uk-cardiff-1, 20: uk-gov-cardiff-1,
21: uk-gov-london-1, 22: uk-london-1, 23: us-ashburn-1, 24: us-gov-ashburn-1, 25: us-gov-chicago-1,
26: us-gov-phoenix-1, 27: us-langley-1, 28: us-luke-1, 29: us-phoenix-1, 30: us-sanjose-1): 9 #这里选择区域
Do you want to generate a new API Signing RSA key pair? (If you decline you will be asked to supply the path to an existing key.) [Y/n]: y #输入y
Enter a directory for your keys to be created [/root/.oci]:
Enter a name for your key [oci_api_key]:
Public key written to: /root/.oci/oci_api_key_public.pem
Enter a passphrase for your private key (empty for no passphrase):
Private key written to: /root/.oci/oci_api_key.pem
Fingerprint:
Config written to /root/.oci/config


If you haven't already uploaded your API Signing public key through the
console, follow the instructions on the page linked below in the section
'How to upload the public key':

https://docs.cloud.oracle.com/Content/API/Concepts/apisigningkey.htm#How2
3)复制生成的公钥,获取命令如下。
cat /root/.oci/oci_api_key_public.pem
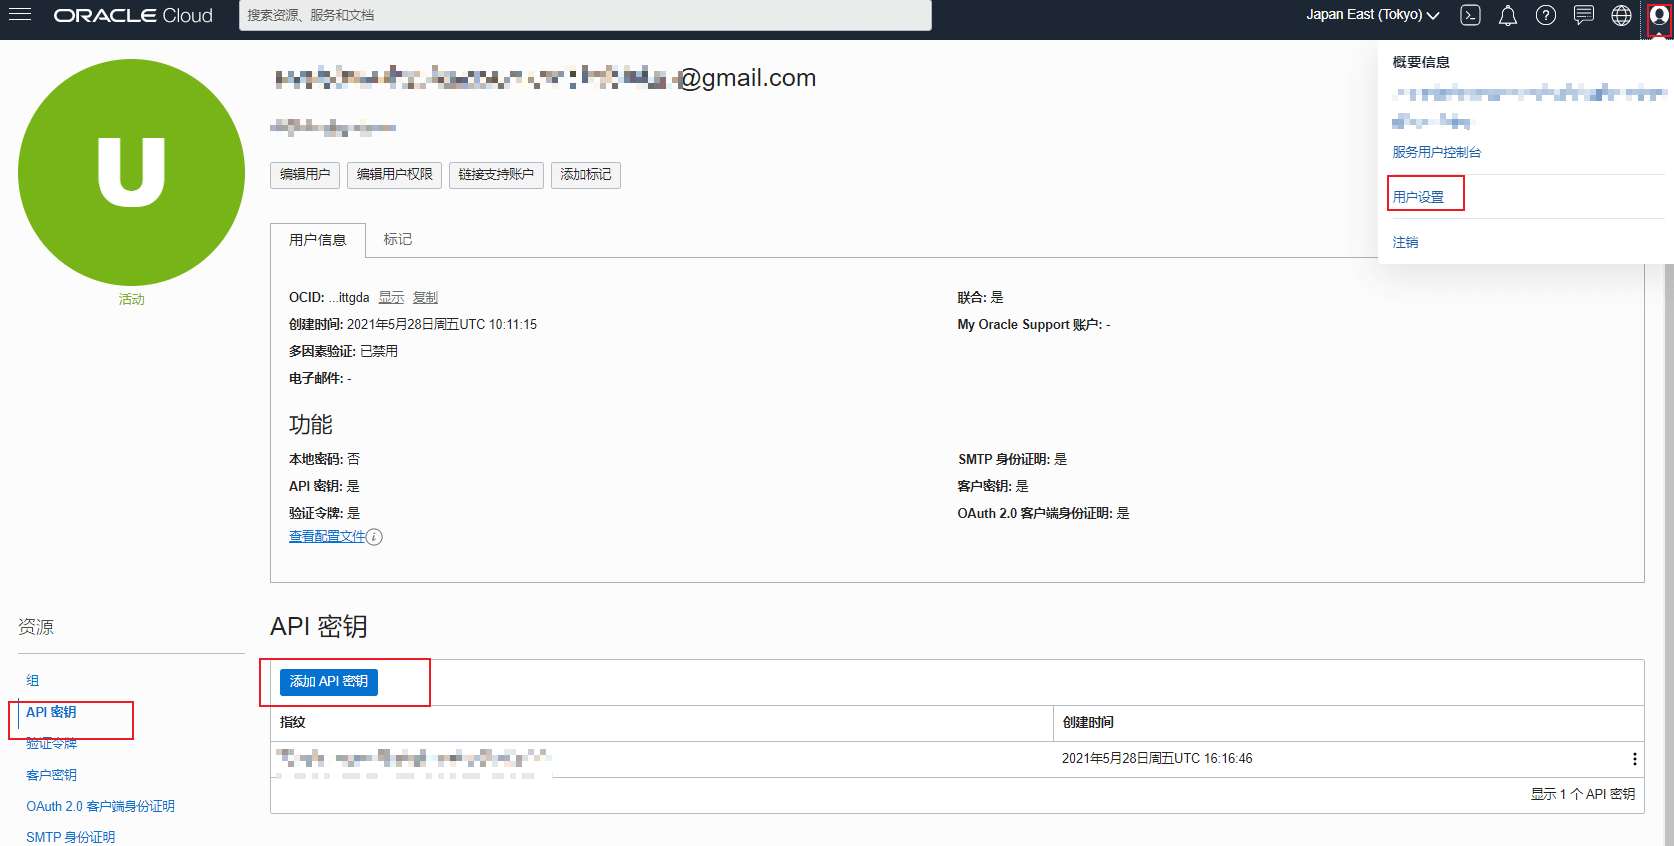
4)把展示出来的内容复制下来。并且添加到,甲骨文后台=>用户设置>>资源>>API秘钥>>添加API秘钥,看图:
5)检查oci配置是否正确
oci iam availability-domain list
如果这样提示表示配置正确,如果不是,检查你前面的配置
[root@host63c0dcac37 ~]# oci iam availability-domain list
{
"data": [
{
"compartment-id": "ocid1.tenancy.oc1..aaaaaaaauoxxxxxxxxxxxxx",
"id": "ocid1.availabilitydomain.oc1..aaaaaaaaaixxxxxxxxxxxxx",
"name": "uffff:AP-TOKYO-1-AD-1"
}
]
}
5、Terraform环境初始化
1)最开始的时候,我们安装好了,Terraform,现在开始初始化代码:
cd /opt/
mkdir terraform-learning && cd terraform-learning
wget https://raw.githubusercontent.com/Jacob-god/Jacob-god.github.io/master/images/main.tf
terraform init
2)修改脚本中的变量值,因为是宝塔面板,所以只要登录宝塔进入/opt/terraform-learning目录修改main.tf,即可,具体的只要修改几个变量即可,如下:
availability_domain= #地区 NMOF:AP-TOKYO-1-AD-1
compartment_id= # 账户租户ID
subnet_id= # 子网络ID
ssh_authorized_keys= # SSH密钥
source_id= #镜像ID imageId
3)以上的变量是在你创建实列的时候按下F12,找到instances,在network查询到。如下图,在创建页面,点击创建之后,会有一个instances的请求,查看这个请求的Request Payload,里面会有我们需要用到值: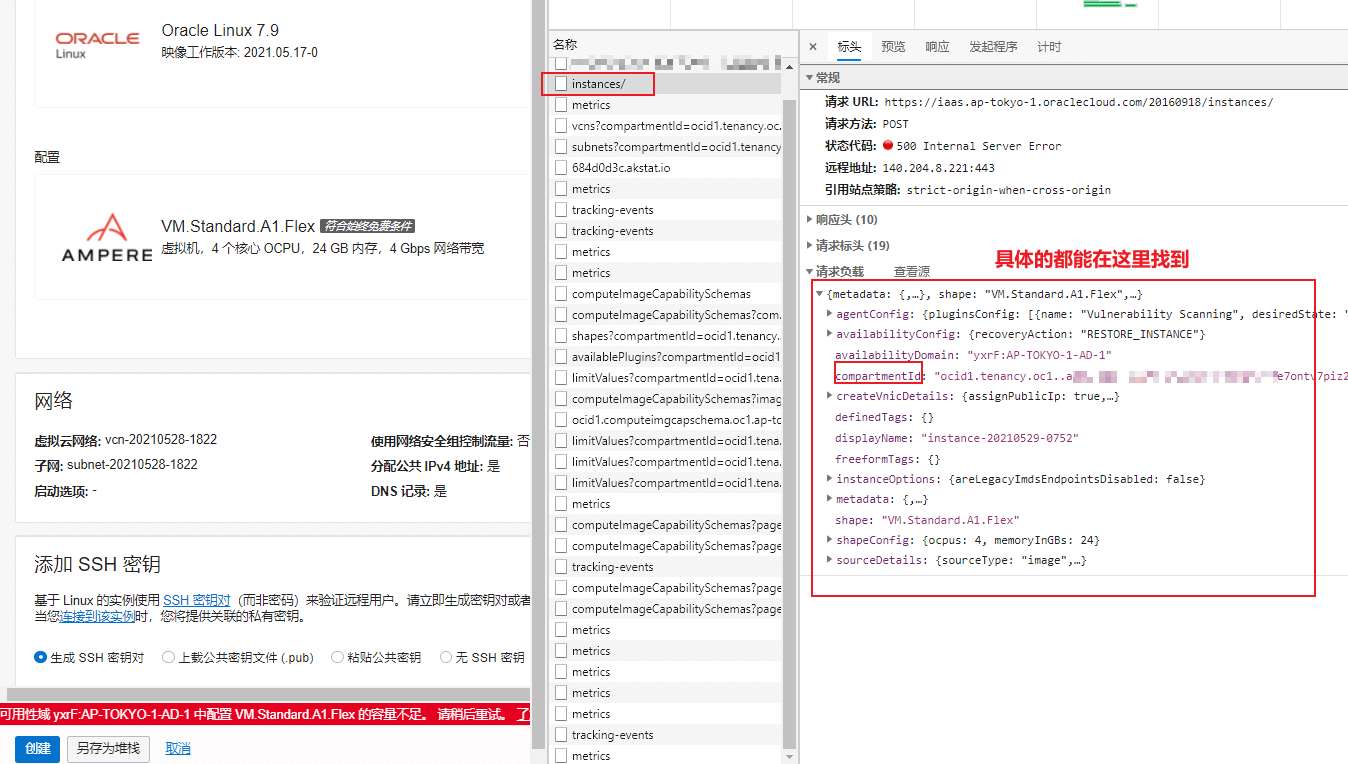
4)以上完善后,开始创建任务,用命令:(注意还是在/opt/terraform-learning)
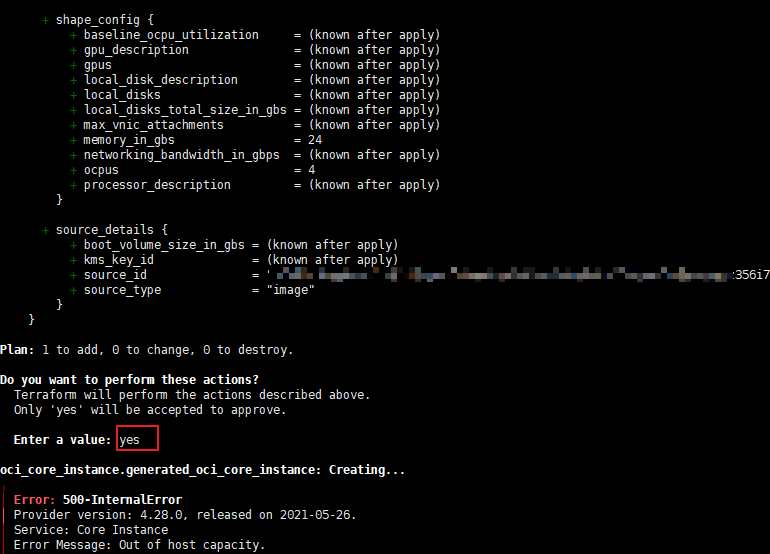
terraform apply
上图还能看到API返回Error Message: Out of host capacity,提示主机容量不足,这个就和我们用鼠标点击的效果是一样的了。下面就用脚本来不停刷新即可。
6、部署
1)到这里总算是可以部署脚本来获取机器了。可以在root目录下新建一个terraform.sh,如下:
vi terraform.sh
2)把如下代码复制进去。
#!/bin/bash

path='/opt/terraform-learning/'

cd $path &&
while true
do
echo 'yes' | terraform apply
sleep 1s
done
3)给Shell脚本赋予执行权限
chmod +x terraform.sh
4)我们利用screen来执行脚本,centos,可以用 yum -y install screen 来安装即可。debian等,执行apt -y install screen 来执行安装。安装好后,新建会话。具体如下:
screen -S terraform
bash terraform.sh
注意,这里的terraform.sh是放在root目录,所以你理所应当的在root目录执行这个命令。退出,CTRL+A+D。
5)当然,你也可以直接用nohup来执行脚本。
nohup ./terraform.sh >> terraform.log 2>&1 &
注意,这里结束脚本,用 pkill terraform
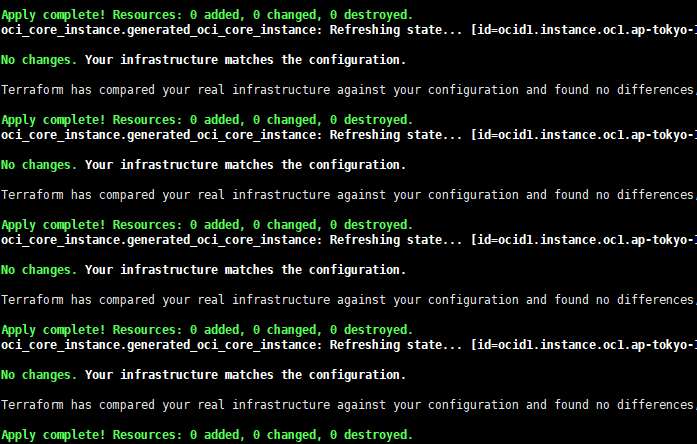
你也可以登录甲骨文后台查看实列,会看到你心仪的arm已经到手啦!
7)如果用的是screen,当你抢到后,需要删除会话,可以用这个命令。
screen -S PID -X quit
pid,可以用命令screen -ls来查找。举例:
[root@localhost ~]# screen -ls
There are screens on:
9975.daniao (Detached)
[root@localhost ~]# screen -X -S 9975 quit
[root@localhost ~]# screen -ls
There is a screen on:
9975.pts-0.localhost (Detached)
1 Socket in /var/run/screen/S-root.
7、注意
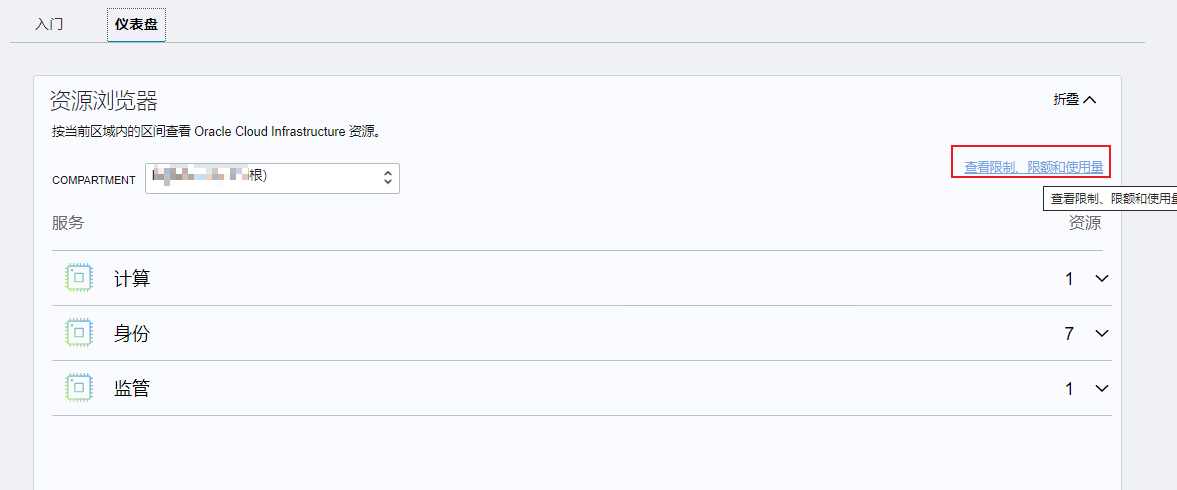
脚本执行之后,会一直调用API创建实例,可以通过甲骨文控制台的限制策略,限制一下资源,以免一直创建,方法如下:
2)创建策略名称和说明随意填写,限额策略里面填如下代码
set compute-core quota standard-a1-core-count to 8 in compartment xxx where request.region = ap-tokyo-1
这条策略的意思是,限制我用户xxx,在东京区域,只能创建最多8个cpu的资源,注意,把这里的XXX修改为你的用户名。
3)然后,在限制使用量这里,输入Cores for Standard.A1 based VM and BM Instances查询一下可用数量,如下图就代表限制成功。
8、最后
抢个甲骨文是真不容易啊,这一大堆的怼下来,估计要头昏了。不过看到VM.Standard.A1.Flex的高配置,这点辛苦也值了。






请先 !